
A long time ago, I heard Judge Judy recite the “thin skull” rule on her court TV show:
”Defendants must take their victims as they find them”.
I think the same holds true for vintage clothing collectors. That is, they must take their vintage pieces in the condition they find them. Fans of vintage do have a choice as to whether or not they will accept the condition of a treasure they’ve found, but if they pass on purchasing it, who knows if they’ll ever see another one? There lies the rub, and it’s maddening.
As an insatiable vintage necktie collector, my world opened up when I discovered that I could actually hand-wash my ties. While some condition issues can’t be repaired (large holes, fading, etc), some vintage ties can be freshened up and even brought back to life with a good dunking.
I started an Instagram page to share some of my favorite vintage necktie designs (bellywarmers_vintage_ties) and since then, many other collectors have contacted me to ask about the process I use to clean them. I decided to document the steps here.
BUT, and this is VERY IMPORTANT:
This tutorial is for washing RAYON NECKTIES ONLY!
Do not attempt to hand-wash silk ties, crepe material, nylon/acetate blends or any type of fabric other than rayon. Silk colors will bleed, crepes will twist out of shape and nylon/acetate fabrics can curl up. Once these things happen, they cannot be remedied and you will ruin your tie forever. If the tie is not rayon or you are unsure of the fabric content, DO NOT RISK IT. You have been warned!
Luckily, however, if you are a midcentury vintage collector like me, you are probably well-aware that the material of choice for men’s ties during this period was indeed rayon. Silk material was being rationed for the WW2 effort (parachutes), and in an age where many men were expected to wear a necktie every day (even for casual dress), necktie manufacturers pivoted and focused on rayon fabrics instead. Rayon does not have the same smoothness or lightweight elegance as silk, but for a guy that collects 70+ year old clothing today, I am REALLY grateful for it. It’s heartier, beefier and much shinier than silk. Designs *pop* off the fabric and inventive hidden brocades can often be found woven into the material. In short, rayon is the reason I have been able to grow my collection to the size it is today (9,500 neckties and counting) because the material has stood the test of time.
So what does this mean in “real” terms? It means that if a vintage necktie collector stumbles across a fabulous 40’s tie that has ancient chin-grease stains, soup spills or is just plain dirty, and the tie is made of rayon, that tie can probably be cleaned up and worn again! It can be enjoyed again…saved from a landfill, or (equally as painful) a quilt. You wouldn’t throw away a beautiful midcentury painting, would you? No! Vintage neckties are wearable works of art, and in my opinion, deserve to be preserved. Plus, they’re cool as hell.
Ok, so this is how I wash my babies. Remember, RAYON TIES ONLY…

Behold…the dirtiest vintage tie I have ever acquired. Seriously, it was absolutely filthy. But I really liked the subject matter (dirty oil rigs), so I decided to roll the dice and see if I could clean it up enough to wear it. The burnt orange color was somewhat difficult to photograph, but I gave it a shot.


As you can see, I really had my work cut out for me, but luckily, this wasn’t my first rodeo.

Tools for the Job
Laundry detergent:
There are a lot of different laundry soaps out there with a lot of different additives included to whiten and brighten clothing. I don’t trust any of them with delicate, 70+ year old fabrics. No Oxiclean, bleach substitutes or advanced whiting formulas for me. I like ol’ skool, no-nonsense, straight-shootin’ liquid laundry detergent; free from dyes, perfumes, additives, and everything else. The detergent shown in the photo comes in a large container and is super inexpensive…perfect for a guy who washes a boatload of vintage ties.
Spray bottle:
For pre-treating, I use an uber-high concentration of soap to water in a spray bottle.
Bucket:
Any bucket will work, but I prefer a rectangular shaped container so the ties plop flatly (“plap”) into the water. It also minimizes twisting and wrinkling, which, in addition to cleaning, is the goal.
Pre-treatment board:
The perforated composite board I’ve used forever as a pre-treatment surface has seen better days and has almost collapsed on itself. It still does the job though…for now.

Drying bar:
I use a suit hanger with the trouser bar removed to hang wet ties for drying. It works great. You could also hang ties on a shower curtain rod or any other smooth, horizontal, pipe-like span (next album title?).
*****
Easy Pre-treat
My entire necktie washing process happens in a large, two-tubbed utility sink. The perforated pre-treatment board sits right on top of the sink so that any dripping soap water ends up in the drain.
I use COLD WATER ONLY to minimize the risk of any fabric bleeding that can occur with warm, or even lukewarm water. Cold water and soap only!
To start, add cold water to the spray bottle, then add soap, replace the trigger, and shake vigorously to mix. As I noted before, I use a high concentration (approx. 20/80) of soap to water, but you can add more soap if necessary. After mixing, spray a little bit of the solution on your fingers to test. It should feel REALLY slippery and soapy. If it doesn’t, add more.
Examine the tie to be cleaned carefully. Take note of the locations of the most egregious marks and stains (almost always at the knot area). Lay the tie lengthwise on the board and spray it heavily with the soap solution. Don’t be shy…really wet it down.


Next, rub your fingers across the entire length of the tie, focusing on the areas that are the most soiled. Work the soap into the fabric. Do NOT use a brush or any other kind of tool, as you could damage the fibers. Remember, the tie is really old. Use ONLY your soft, supple, lady-like fingers.
Spray the entire tie down again. Rub it more. Take your time. Then turn the tie over and follow the same procedure on the back, especially the tip lined ends.

Finally, turn the tie over and spray it again. Pick it up and rub the heavily soiled areas between your thumb and forefinger. This is your last chance to really work the soap into the stains.
Lay the tie back down on the board and spray it one more time. Then let it sit for 30 minutes while the soap continues to do it’s job.
You are on your way!
*****
Get to Dunkin’
After 30 minutes have passed, it’s time for the main event!
Add cold water to the bucket. For one necktie, I fill to about five inches. You want enough water to cover the tie completely when submerged. Add copious amounts of soap. Mix the solution thoroughly with your fingers and confirm heavy slipperiness. Add more soap, if necessary. (Tip: if you add water to the bucket BEFORE adding soap, there will be little or no foaming.)
Fold the pre-treated tie in half, and then in half again. Plap it into the bucket.

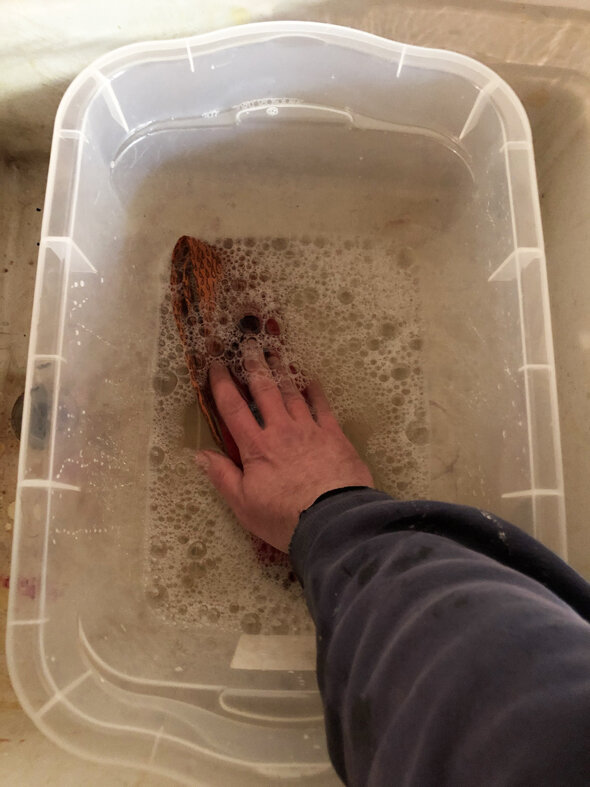
Reach into the bucket and with your flattened hand, press down evenly on the tie to submerge it in the solution. Hold for a few seconds to allow any air to be released. The tie should then stay submerged.
Then, with your flattened hand, lightly pump up and down on the tie to push and pull the solution through the fibers. The goal here is to pulsate the soap through the tie without changing it’s shape. This is why a rectangular bucket is helpful.
Stop after about 30 seconds and make sure the tie stays submerged. Then let it sit in the solution for one hour, but return every ten minutes or so to repeat the pulsating exercise. As the soap loosens the ancient dirt, oils and proteins in the fibers, the pulsing action will help push them out of the tie.

Here’s what this bucket looked like after an hour of soaking. It’s astounding how much cigarette smoke, food and other crap can be trapped in one single necktie!

Pretty amazing!
*****
Rinse Me, Baby
After an hour of soaking, it’s now time to rinse it all away. Pulling dirt from the tie was the primary objective before, but the goal now is to get rid of both the dirt and the soap.
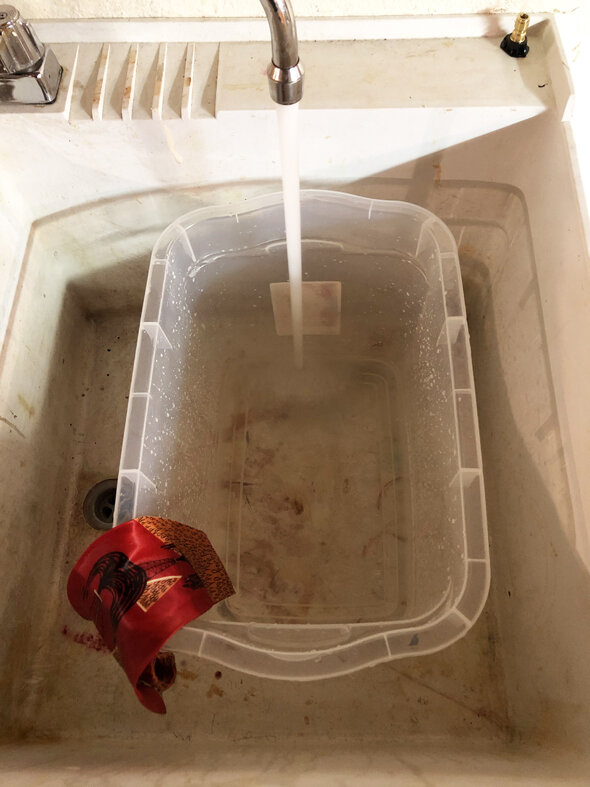

Gently lift the tie out of the bucket and set it aside. Dump the crap water out and thoroughly rinse the bucket to remove all of the soapy residue. Fill the bucket to the same level again with cold water and plap in the tie.
Like before, push the tie under the waterline and pump for 30 seconds. Remove the tie, wash out the bucket, and repeat. Three cycles of this should remove all traces of soap and dirt, but if you continue to see residue in the bucket or on the tie, add additional rinses.

Next, fold the tie in half one more time and hold it in the palm of your hand. Lightly press down on top of the tie with your other hand and squeeze out the bulk of the clean water. Any remaining water in the tie will be removed during the final drip-drying step.
You’ll probably notice now that your rayon tie feels and looks a lot better! The fabric almost squeaks when you roll it between your thumb and forefinger. This is what simple detergent, a disciplined cleaning process and generous soak times can do…they have already worked wonders on your baby!
*****
I Blocked You
Up to now, you’ve hopefully managed to avoid twisting, pulling or wringing your tie as you’ve been washing it. This careful handling will pay off HUGE later on after the tie has dried. I call it “pre-blocking”.
I’ve noticed that a lot of people don’t pay much attention to blocking. They wash a vintage garment and let it dry any ol’ way with the intention of ironing or steaming it smooth later on. While I do iron my ties, I really don’t want to work that hard at it, so I take the time to block my ties correctly BEFORE they dry to save myself valuable fixing time later on.
After you’ve lightly squeezed most of the water out of the tie, drape it over the hanging bar to drip-dry completely (my hanger dangles above the sink to catch the fallout). Line up up the tips of the wide blade and the tail. Turn the wide blade around to the back folds and pull down the buckram piece that runs inside the length of the tie. Make sure it’s straight, flat and not crumpled up.

Next, pull and smooth the inside tip lining as much as possible, so it hugs the underside of the rayon fabric. Then close up the back folds and straighten them. The goal is to have everything flat and evenly layered as much as possible under the folds (with no lumps or bundled up material), just as the tie looked when it left the factory. Follow these same steps for the tail.

Next, turn the tie around and smooth out the front. Start at the top near the hanging bar and work your fingers down the edges toward the bottom. Gently pull across the front of the tie to even up the sides. Smooth out and straighten the bottom tip. Make the tie a long, smooth, uniform triangle if you can. Take your time. I’ve found that if a vintage tie was made well to begin with (which most of them were, especially by today’s standards), the fabric will usually stay in place and hang evenly once it’s set. Follow these same steps for the tail.
As I’ve already noted (ad nauseam), taking the time to block the tie now will save tons of pressing time later on, not to mention minimizing the abuse that a hot iron or steamer can inflict on vintage fabric. In fact, I sometimes don’t even bother with pressing. Many of the ties I’ve photographed for my Instagram page weren’t ironed at all.
A sidenote:
I do know other collectors who wash their ties and don’t hang them to dry. They prefer instead to stretch them out on the lawn and let the sun bake them. One friend even told me that he believes the chlorophyll in grass actually brightens the colors of the ties. I have no way of knowing if this is true or not, but I tried it once and really missed the ability to hang and block the tie exactly the way I wanted it.

When you’ve finished fiddling and the tie is hanging nice and straight, step back and admire your work. I usually reward myself with a delicious treat for a job well done. I like scotch.
*****
Drumroll, Please…
How did I do? Take a look at these before/after pics and judge for yourself:
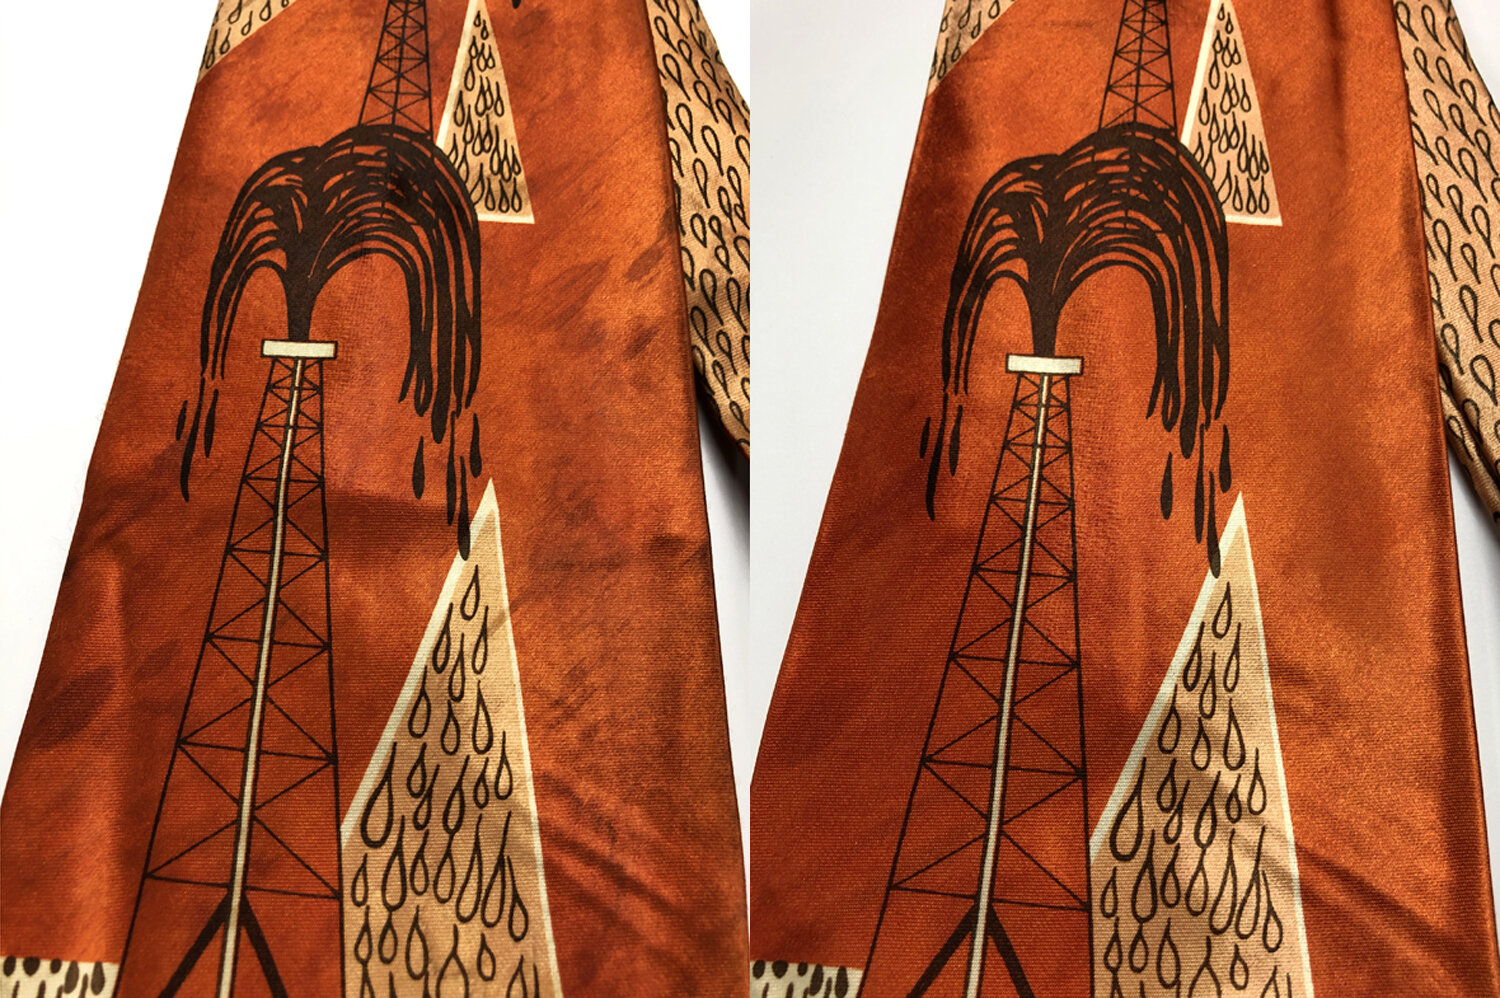


Overall, I am VERY HAPPY with the results!
Is this tie “factory fresh'“? No. But is it crisp, clean, and wearable again? Absolutely! The colors are more vibrant and it smells great, too. Plus, improving this tie’s condition means that I’ve also improved the value of my collection. It’s a win-win-win all around :)
So, Viva la Vintage! I hope this tutorial has helped you realize the potential for your own vintage ties and future gems you plan to add. Most importantly though, I hope to see you wearing and sharing them proudly with the world! Until then…
GET TO DUNKIN’!
(Click here to see some of my favorite vintage neckties from my collection)